Bone broth has taken the spotlight, and for good reason! This nutrient-rich, collagen-boosting broth is not only incredibly affordable but also simple to make at home. Whether you’re using an Instant Pot, slow cooker, or traditional stovetop method, crafting a deeply flavorful and nourishing broth has never been easier.


In this guide, I’ll walk you through step-by-step instructions, pro tips, and answers to your most common bone broth questions so you can create a rich, restorative broth that’s perfect for sipping or using in your favorite recipes. Let’s get started!
What is Bone Broth?
Bone broth is a rich, savory, and collagen-packed liquid made by slowly simmering marrow-rich animal bones, such as beef, chicken, turkey, or pork, along with aromatic vegetables like celery, carrots, and onions. Fresh herbs and garlic add depth of flavor, making this nourishing broth both delicious and versatile.
One of the key factors in a high-quality bone broth is its gelatinous texture when cooled, which indicates a strong concentration of protein and collagen. To enhance this process, a splash of apple cider vinegar or white vinegar is often added, helping to break down the bones and connective tissue for a more nutrient-dense result.
How is Bone Broth Different from Regular Broth or Stock?
The lines between bone broth, stock, and broth can be a little blurry, but here’s what sets them apart:
- Bone Broth : Deep golden, rich, and collagen-packed. Made by simmering collagen-rich bones (like beef knuckles, chicken feet, or turkey carcasses) for an extended period, 12+ hours on the stovetop or at least 3-4 hours in a pressure cooker. The result? A nutrient-dense, gelatinous broth that solidifies when cooled due to its high gelatin content.
- Stock : Thicker than regular broth, stock is made by simmering bones and connective tissues for a shorter time than bone broth. It can still be somewhat gelatinous, depending on the bones used. For example, homemade chicken stock can be made using a whole chicken or just the leftover carcass.
- Regular Broth : The thinnest of the three, broth is made primarily from meat rather than bones. It lacks the gelatin-rich consistency of stock or bone broth and is commonly made by boiling chicken, beef, or vegetables. A good example is the liquid left over after poaching chicken, this is considered chicken broth.
Which One is Best?
If you’re after maximum collagen, nutrients, and gut-healing benefits, bone broth is the clear winner! Just make sure it’s simmered long enough to extract all the goodness from the bones.


Ingredients
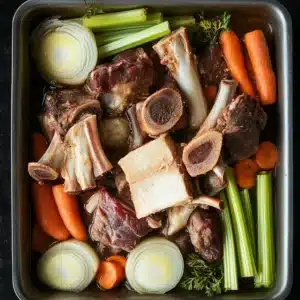
- 10 pounds beef bones – preferably a mix of marrow bones (femur bones) and bones with meat on them (oxtail, short ribs, and knucklebones cut in half)*
- 4 large carrots – chopped into 2-inch pieces
- 2 medium onions – quartered
- 2 whole heads garlic – halved crosswise
- 6 stalks celery – cut into 2-inch pieces
- 4 bay leaves
- ¼ cup black peppercorns
- 4 whole star anise
- 2 whole cinnamon sticks
- 2 tablespoon apple cider vinegar
Instructions
- Blanch the Bones: Place the bones in two large stock pots and cover with cold water. Bring to a boil over high heat and let simmer for 15-20 minutes. Drain and rinse the bones thoroughly.
- Roast the Bones & Vegetables: Preheat the oven to 450°F (232°C). Spread the blanched bones, carrots, onions, garlic, and celery onto two roasting pans (avoid overcrowding). Roast for 30 minutes, toss gently, then roast for another 15-30 minutes until deeply browned.

- Transfer & Deglaze: Wash the stock pots before returning the roasted bones and vegetables to them. Scrape up the browned bits from the roasting pans using a metal spatula and a little water, this is pure flavor! Add everything to the pots.
- Boil the Bones: Divide the bay leaves, peppercorns, star anise, cinnamon sticks, and apple cider vinegar between the pots. Fill each pot with 12 cups of water (or enough to fully submerge the bones). Cover and bring to a gentle boil.
- Simmer Low & Slow: Reduce heat to low and simmer for at least 8-12 hours (ideally 24 hours). Keep the lid slightly ajar and skim off any foam or fat occasionally. If needed, add more water to keep the bones submerged. (Tip: If simmering overnight, refrigerate and continue the next day for safety.)
- Strain & Collect the Meat: Strain the broth through a fine-mesh sieve. Pick off any remaining meat from the bones, it’s still flavorful and great for soups or sandwiches! Discard the bones and vegetables.
- Skim the Fat (Optional): Cool the broth quickly by adding ice and covering with a lid. Refrigerate until a thick fat layer forms on top. Remove it with a spoon or fork to yield a gelatinous, collagen-rich broth.
- Store & Enjoy: Store broth in the fridge for up to 5 days or freeze in smaller portions for up to 6 months. It reheats beautifully!


Benefits of Bone Broth
Bone broth has gained popularity for its potential health benefits, thanks to its nutrient-rich composition. While scientific research is still ongoing, many believe it may offer the following advantages:
- Nutrient-Dense & Mineral-Rich: Bone broth contains calcium, magnesium, potassium, phosphorus, and trace minerals like zinc, iron, boron, manganese, and selenium. It also provides vitamins A and K2, which support overall health. The exact nutrient content varies based on the bones and ingredients used.
- Supports Joint Health: Collagen in bones and connective tissue breaks down into gelatin, which is rich in amino acids like glucosamine and chondroitin, compounds often used to relieve osteoarthritis symptoms and joint pain. Some studies suggest they may help improve joint function and reduce discomfort.
- May Improve Digestion & Gut Health: Bone broth is believed to support gut lining health, especially for individuals with leaky gut syndrome or inflammatory bowel disease (IBD). The amino acids found in gelatin, such as glutamine, may help reduce gut inflammation and promote digestive well-being.
- May Enhance Sleep Quality: The amino acid glycine, found in bone broth, has been linked to better sleep quality and relaxation. Some research suggests glycine may help regulate body temperature and improve sleep efficiency.
- Might Aid in Weight Management: Being high in protein, bone broth may promote satiety (fullness), which could reduce overall calorie intake. However, its effectiveness in weight loss remains debated, as a single cup of bone broth may not be filling enough for everyone.
- Potential Anti-Inflammatory Effects: Bone broth contains glycine and arginine, two amino acids known for their anti-inflammatory properties. Arginine, in particular, may help reduce chronic inflammation, which is linked to heart disease, arthritis, diabetes, and metabolic disorders.
What are the Best Bones for Bone Broth?
The key to a nutrient-dense, gelatin-rich bone broth lies in selecting the right combination of bones. The best options include bones that are high in collagen, marrow, and connective tissue, which break down during simmering to create a flavorful, gelatinous broth.
Best Beef Bones for Bone Broth
For a deeply flavorful and collagen-packed beef bone broth, use a mix of:
- Knuckle bones : High in cartilage and collagen, essential for a rich broth.
- Joints :Contain connective tissue that adds body and nutrients.
- Feet (cow hooves) : Loaded with gelatin for an extra-thick broth.
- Marrow bones (femur, tibia, humerus) : Provide a creamy, nutrient-rich marrow flavor.
- Meaty bones (oxtail, shank, short ribs, neck bones) : Enhance the flavor and add more depth.
Best Chicken Bones for Bone Broth
For a lighter, but still gelatinous broth, chicken bones are an excellent choice:
- Chicken feet : One of the best sources of gelatin and an affordable option.
- Chicken wings & drumsticks : Contain a lot of connective tissue and collagen.
- Chicken carcass & neck : Great for extracting deep chicken flavor.
Other Bone Options
- Pork bones : Great for a slightly sweet and rich broth; use pig feet for extra gelatin.
- Fish bones (heads and spines) : Create a lighter, mineral-rich broth packed with omega-3 fatty acids.
Tips and Tricks
If you want deeply flavorful, nutrient-rich bone broth, these tips will help you achieve the best results!
-
Use a Variety of Bones
Not all bones are the same, some provide gelatin, while others add flavor. Use a mix of marrow bones, knuckles, joints, feet, and meaty bones to get the best balance of nutrients and taste.
-
Always Blanch Before Roasting
Blanching removes impurities that can make your broth cloudy and affect its flavor. Simmer the bones in boiling water for 15-20 minutes, then drain and rinse them before roasting.
-
Roast the Bones for Maximum Flavor
High-heat roasting (450°F/232°C for 30-45 minutes) caramelizes the bones and enhances the richness of the broth. Don’t skip this step if you want a deep, complex flavor.
-
Keep Additions Minimal
Avoid overpowering the broth with too many vegetables, herbs, and spices. Stick to basics like onions, carrots, celery, and a few aromatics (garlic, bay leaves, peppercorns). Let the bones be the star!
-
Use a Large Enough Pot (or Two!)
Make sure the bones are fully submerged in water while simmering. If needed, divide them into two pots for the best extraction of nutrients.
-
Simmer Long Enough (But Not Too Long!)
Aim for 12-24 hours for beef bones. This allows the collagen to break down into gelatin without over-extracting minerals, which can cause bitterness. Do NOT simmer longer than 24 hours.
-
Skim the Fat for a Cleaner Broth
After cooling, remove the top fat layer (optional). If you prefer a richer broth, leave some fat in, it melts back when reheated.
-
Season After Simmering
Don’t expect great flavor without adding salt! Since bone broth is a base, season to taste after it’s fully cooked.
How to Store Bone Broth?
For optimal storage, I keep my bone broth in airtight jars or freezer-safe bags, ensuring it stays fresh for up to five days in the refrigerator and up to six months in the freezer. When freezing, I prefer using tall, narrow glass jars that fit well in deep freezers, leaving space for expansion. Ice cube trays are also a handy option for portioning out small servings. For easy access, I often store leftovers in a covered pot in the fridge, making reheating on the stovetop quick and convenient. If frozen, the broth can be thawed overnight or warmed directly from frozen. Labeling containers with the date helps keep track of freshness and ensures I always have a nourishing batch ready to go!
How long will leftover bone broth last?
Bone broth stored in the refrigerator will stay fresh for about 4 to 6 days, while in the freezer, it can last for 4 to 6 months.
Bon Appetit!


Bone Broth
Notes
Ingredients
- 10 pounds beef bones - preferably a mix of marrow bones (femur bones) and bones with meat on them (oxtail, short ribs, and knucklebones cut in half)*
- 4 large carrots - chopped into 2-inch pieces
- 2 medium onions - quartered
- 2 whole heads garlic - halved crosswise
- 6 stalks celery - cut into 2-inch pieces
- 4 bay leaves
- ¼ cup black peppercorns
- 4 whole star anise
- 2 whole cinnamon sticks
- 2 tablespoon apple cider vinegar
Instructions
- Blanch the Bones: Place the bones in two large stock pots and cover with cold water. Bring to a boil over high heat and let simmer for 15-20 minutes. Drain and rinse the bones thoroughly.
- Roast the Bones & Vegetables: Preheat the oven to 450°F (232°C). Spread the blanched bones, carrots, onions, garlic, and celery onto two roasting pans (avoid overcrowding). Roast for 30 minutes, toss gently, then roast for another 15-30 minutes until deeply browned.
- Transfer & Deglaze: Wash the stock pots before returning the roasted bones and vegetables to them. Scrape up the browned bits from the roasting pans using a metal spatula and a little water, this is pure flavor! Add everything to the pots.
- Boil the Bones: Divide the bay leaves, peppercorns, star anise, cinnamon sticks, and apple cider vinegar between the pots. Fill each pot with 12 cups of water (or enough to fully submerge the bones). Cover and bring to a gentle boil.
- Simmer Low & Slow: Reduce heat to low and simmer for at least 8-12 hours (ideally 24 hours). Keep the lid slightly ajar and skim off any foam or fat occasionally. If needed, add more water to keep the bones submerged. (Tip: If simmering overnight, refrigerate and continue the next day for safety.)
- Strain & Collect the Meat: Strain the broth through a fine-mesh sieve. Pick off any remaining meat from the bones, it’s still flavorful and great for soups or sandwiches! Discard the bones and vegetables.
- Skim the Fat (Optional): Cool the broth quickly by adding ice and covering with a lid. Refrigerate until a thick fat layer forms on top. Remove it with a spoon or fork to yield a gelatinous, collagen-rich broth.
- Store & Enjoy: Store broth in the fridge for up to 5 days or freeze in smaller portions for up to 6 months. It reheats beautifully!